Stylized Lit Shader
Stylized Lit Shader Brief Overview
Stylized Lit shader is a main go-to lit shader to be used in the majority of situations. It is a stylized shader, whose output ranges from a strict one-color flat surface to a cartoon style look, to a vivid acid-color experimental mess, with lots of the sweet spots in between.

Quibli Stylized Lit Shader. Basic view. Once the parameters are enabled, the interface is being expanded
Beginning to work with the Stylized Lit Shader
- Create a material.
- In the Inspector panel, in the Shader drop down menu choose Quibli ▶︎ Stylized Lit. Now you can apply this material to a 3D game object on your Scene or in the Hierarchy panel.
Parameters of the Stylized Lit Shader
Gradient
This is one of the highlight features of Quibli shaders. Put simply, Gradient (also referred as Gradient Editor) lets you dial in up to 8 independent colors per single material. You can make the color bands as wide or narrow as you want. In this manual we keep returning to this über-parameter with different examples.
The same Gradient Editor is available for the following shaders: Stylized Lit, Foliage, Skybox, Cloud3D, Cloud2D. You can find the detailed explanation of the Gradient in the ‘Gradient’ sub-chapter of ‘Stylized Lit shader’ chapter
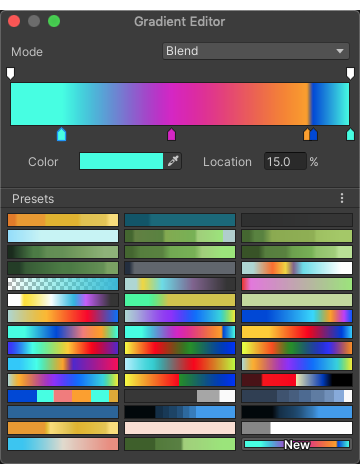
Clicking on an icon of the Gradient opens the Gradient Editor where you can freely add up to eight individual independent color breakpoints (color stops) and move them across the ramp. The layout of the colors on the breakpoints corresponds to the layout of the colors on the scene object the material is applied to. When you move the breakpoint or change the color values in Gradient Editor, the shading changes on the affected object(s) simultaneously, in real time. It is extremely useful for fine-tuning the color positions on the object. Also, it works for the models that have no UV maps.
Gradient Editor is real-time
TIP. Whenever you make up an interesting gradient in the Gradient Editor, you can save it by pressing the ‘New’ button in the ramp presets section of the Gradient Editor. This adds an icon of the gradient to the collection, which is really useful if you want to quickly preview different possible gradients.
Using presets in the Gradient Editor
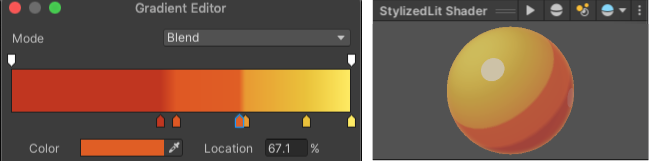
There are ‘smooth’ and ‘fixed’ color gradations in the Gradient editor. You can have a sharp transition from one color to another by selecting a Fixed mode (using 1 color stop). If you select Smooth mode, the transition from color band to the adjacent one will be gradual. See the pictures below.
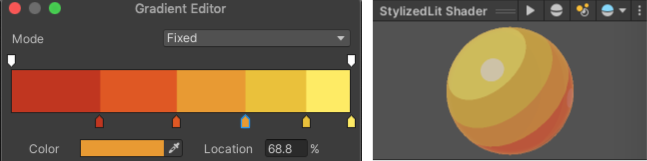
Gradient Editor in Fixed mode — the color bands have distinct boundaries

Gradient Editor in Blend mode — the color bands have gradual boundaries
In Smooth mode you can set all or some of the color stops closely to the adjacent ones to make a stepped (reminiscent of Fixed mode) or partially stepped / partially smooth gradient.
Gradient Editor in Blend mode with partially tight color stops
Please, note that if you would like to get a smooth gradient, your model should have smooth normals. Otherwise, even if you have the Blend mode chosen, but you have a model with hard normals, you’ll likely see a stepped gradient. If you have no option to edit a model, you can try adjusting the parameters in the model’s Import Settings
- Shading Offset Shading Offset moves the gradient over the model. It’s a convenience parameter, because this effect can be also made by moving all the stop points in the Gradient Editor.

Gradient Editor is real-time
Main Shading Parameters (Other)
- Enable Specular Specular adds a glare to the object. It can be used for adding a small sharp ‘metallic’ specular, a matte diffused one or anything in between. Smaller values make the glare sharper, larger values smoothen the glare. Pressing Enable Specular ‘on’ enables the set of parameters to control the Specular. Specular is an HDR effect.

Stylized Lit Shader — Specular parameters
- Enable Rim Clicking this tick box turns Rim on or off and opens a set of Rim parameters. In some cases it can be used as a contouring pseudo-outline effect, it can accentuate the edges of the models on the scene. Rim depends on the main light’s rotation and the normals of the shaded model. Rim is an HDR effect. If your scene has a bloom effect enabled, Rim can glow, which you can see in many anime movies.
Please, note that Rim is not a substitution for the proper outline effect, like the advanced Outline Image Effect in Flat Kit.
- Rim Color Sets the color of the Rim. This parameter is in HDR.
- Light Align Moves the Rim on the model toward the main light (usually it is a Directional Light). This can be helpful to add stylization on larger Rim Size values (see the animation below).
Adjusting ‘Rim Align’ parameter. Two spheres have different ‘Rim Size’ values and otherwise identical shading parameters
- Rim Size How much of the model the Rim covers.
- Rim Edge Smoothness How smoothly the Rim fades out into the base shading. Smaller values can be used as a sharp contouring effect. Larger values combined with large Rim Size values can result in a soft inner glow, which can add some nonlinearities to the material look. See the animation below.
Adjusting ‘Rim Edge Smoothness’ parameter. Two spheres have different ‘Rim Size’ values and otherwise identical shading parameters
- Enable Height Gradient Ticking this box turns Height Gradient on and opens the parameters for its adjustment. Height Gradient is a world-space ‘color-to-transparency fade-out’ gradient overlay placed over the material. Height Gradient is an HDR effect.
NOTE. Height Gradient is a world-space parameter, which means that if two objects share the same material with the _Height Gradient ‘on’, they share common coordinates of the Height Gradient, unlike, for example, the main albedo Gradient, whose coordinates are local per object. That’s why if you put these two objects some distance apart, they can look different. To make these objects look similar you need to create a separate material for each one.
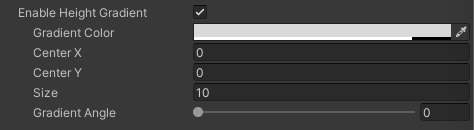
Stylized Lit Shader — Height Gradient parameters
TIP. In a City Demo scene the Height Gradient is sometimes used as a subtle pseudo ambient occlusion, particularly on the bottom of electric poles and houses, which otherwise would have looked kind of detached from the pavement.
TIP. If your scene has some kind of a bloom effect, raising the intensity of the HDR of Specular, Rim, Height Gradient parameters create a glowing effect. It can contribute to the anime look greatly.
Once you enable Height Gradient, the following parameters will appear.
- Gradient Color This color chooser picks the source color of the gradient. The destination color is going to be the same one but transparent.
- Center X The source point on the horizontal axis, from which the Height Gradient is spread.
- Center Y The source point on the vertical axis, from which the Height Gradient is spread.
- Size How spread the Height Gradient is.
- Gradient Angle Rotates the Height Gradient around the Center X and Center Y values in world-space.
- Enable Vertex Colors If enabled, the final shading of the object is multiplied by the mesh’s vertex color values. It is a debug parameter, usually this is not used for changing the look.
- Enable Outline If enabled, the outline and the group of parameters for tweaking it will appear.
Texture Mapping Parameters
Texture Maps Texture Maps is a collapsible/expandable group of parameters that control the albedo, bump (normal) and detail maps. To use these parameters, please, make sure the model is UV-unwrapped.
- Albedo The input for a diffuse texture. Select the texture by clicking on the Select texture slot.
Tiling shrinks and repeats the texture by X and Y axis. Values less than 1 stretch the texture, values bigger than 1 squeeze the texture.
Offset moves the texture over the UV map along X and Y axis.
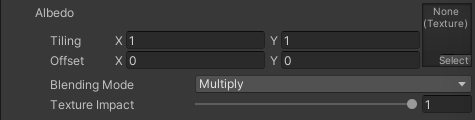
Stylized Lit Shader — Albedo mapping parameters
- Detail Map The input for another kind of diffuse texture. This one has two additional blending modes, which is useful for adding some kind of details into the material.
Tiling and Offset parameters are the same as in Albedo, please look there for the description.
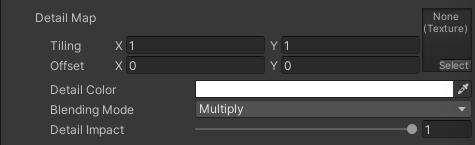
Stylized Lit Shader — Detail mapping parameters
TIP. As this texture input is independent from the Albedo map, you can place a copy of the texture you are using in Albedo map slot, set Blending Mode to Add and by raising the Detail Impact you will have a brighter and more contrast material. We’ve done it in the included Unity Default Sample Scene — the Ellen character has an increased brightness and vividness thanks to this trick.
TIP. If you don’t use any detail textures, select any color in Detail Color chooser, pick an appropriate Blending Mode, then by adjusting the Detail Impact slider you can change the overall tint of the material by moving a single control.
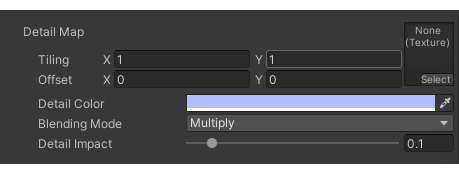
Using Detail Color parameter as an overall material tint
- Bump Map The input for normal maps.
Tiling and Offset parameters are the same as in Albedo, please look there for the description.

Stylized Lit Shader — Bump mapping parameters
Lighting and Shadows Parameters
Lighting Parameters
Lighting is a collapsible/expandable group of parameters that manages the behavior of some of the important light and shadow controls.
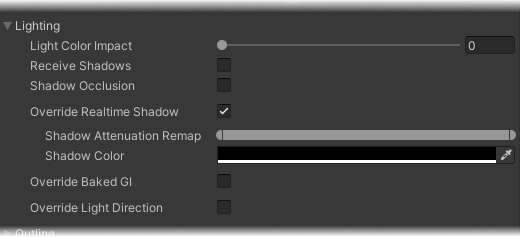
Stylized Lit Shader — Lighting parameters
- Light Color Impact This parameter defines how much of an influence the main light’s color has onto the material. Having this parameter allows you to add a night/day/morning/sunset feel to the scene. By automating the light’s color it is possible to achieve the day cycle effect.
Shadow Parameters
- Receive Shadows Once enabled, the mesh will receive the shadows cast from itself and other objects. Turning Receive Shadows off would disable received shadows from elsewhere as well as self-shadowing.
Turning Receive Shadows off is, probably, the parameter you’d want to turn off right away (it is impossible to do it automatically, since loading Quibli Stylized Lit shader inherits the shadows in ‘on’ state — from the Unity Standard Lit shader, which is loaded every time you create a new material, and which you are switching to the Stylized Lit from).
- Shadow Occlusion Masks received Unity shadows in areas where normals face away from the light. Useful to remove shadows that ‘go through’ objects.
- Override Realtime Shadow A tick box that enables you to replace standard Unity cast shadow with stylized cast shadow, where you can change color, intensity and edge softness. Once enabled, a few shadow-related parameters appear:
- Shadow Attenuation Remap This range slider is a multi-tool, which can control the tightness, intensity and the scale of the cast shadow. Drag the left and right brackets of the range slider to tighten up or loosen down the shadow edges, move the slider by clicking and dragging its center in order to adjust the intensity. To become familiar with what this parameter does, please, experiment with it a bit.
- Shadow Color This control picks up the color of the received shadow. If Shadow Color’s Alpha is set to 0 in the color chooser, you’ll get Unity’s native shadows. In other words, Alpha influences the Shadow Color’s impact.
- Override Baked GI If the scene has baked global illumination using either lightmaps or light probes, this toggles the Baked Light Lookup gradient below.
- Baked Light Lookup This parameter remaps the values of Unity’s global illumination to a custom gradient. The mapping is defined by the luminance of the original GI value — darker values map to the left of the gradient and brighter values map to the right. This allows to creatively change the atmosphere of lightmapped scenes by changing only this gradient, e.g. setting the gradient to red/purple can give the scene a neon sunset look.
- Override Light Direction This is a particularly useful parameter. By enabling it, the material skips the light rotation information from the main light (usually Directional Light) and lets you control the lighting/shading positions manually and independently per material. In other words, if you want to rotate the gradient, shadow, specular, rim etc separately and specifically for any given model, you can do it using this feature.
Outline Parameters
Outline is a collapsible/expandable group of parameters for working with the shader-based implementation of the outlines.

Stylized Lit Shader — Outline parameters
We also have an Outline Image Effect in Flat Kit which is a completely different approach to outlines. In the Quibli’s Stylized Lit shader you have an option to quickly add a contour based on normals of the mesh, though it has a few handy parameters for making it look nice in most of the basic cases.
- Color Selects the color of the contour.
- Width As soon as the slider is at 0, the effect is bypassed and doesn’t affect the performance. Once you start dragging the control to the right, the outline appears on the screen and is becoming thicker as long as you are moving the slider.
- Scale adjust this parameter when you have gaps on the vertices. Try using Width at 0 or at very low value, and increase the Scale parameter. Please note, this is not an ultimate solution, the gaps need a complex approach — in modelling, adjusting the normals, adjusting camera distance etc.
- Depth Offset Pushes the outline ‘to the back of the mesh’. This is particularly useful if the mesh has lots of faces and you want it to look clean and uncluttered. When you move the slider to the right, the mesh loses the outline details inside while emphasizing its outer contour. Also, try using 0 or a very low value if the outline color interferes with the skybox.
- Camera Distance Impact Lets the outline change its width with the distance from the camera. If you want to make it gradually thinner as the object moves from camera, drag the slider to the right.
One of the frequently asked questions is how to get rid of the outline gaps. Below you can find one of the ways to address it.
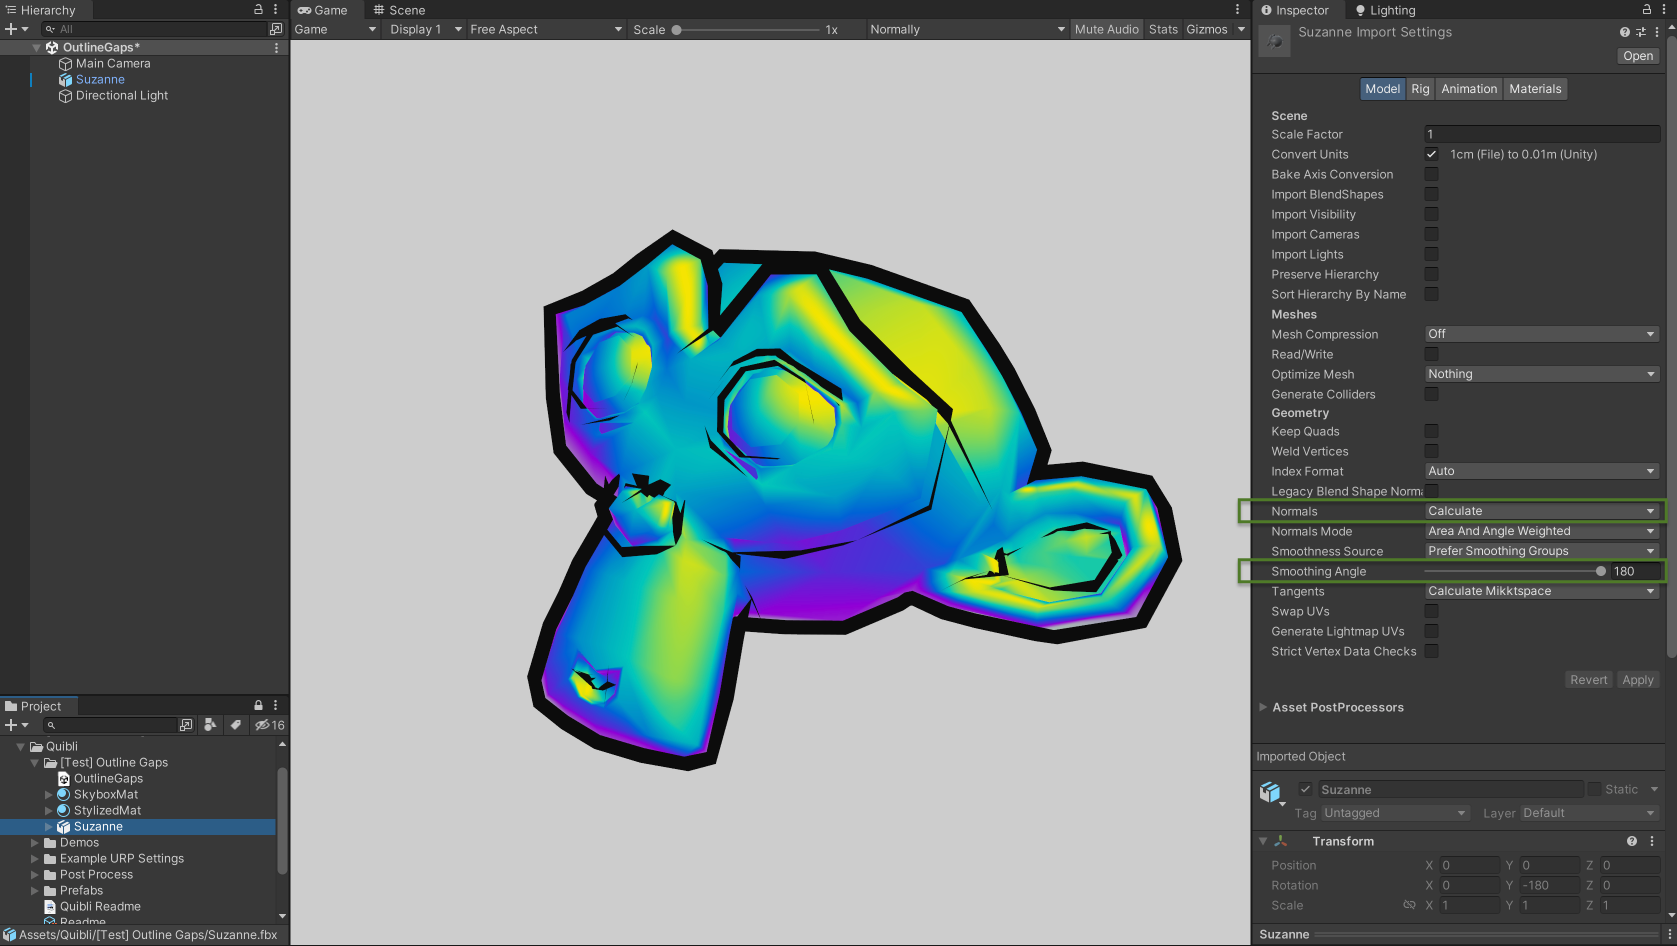
Here we see the gaps in the outline on the hard edges.
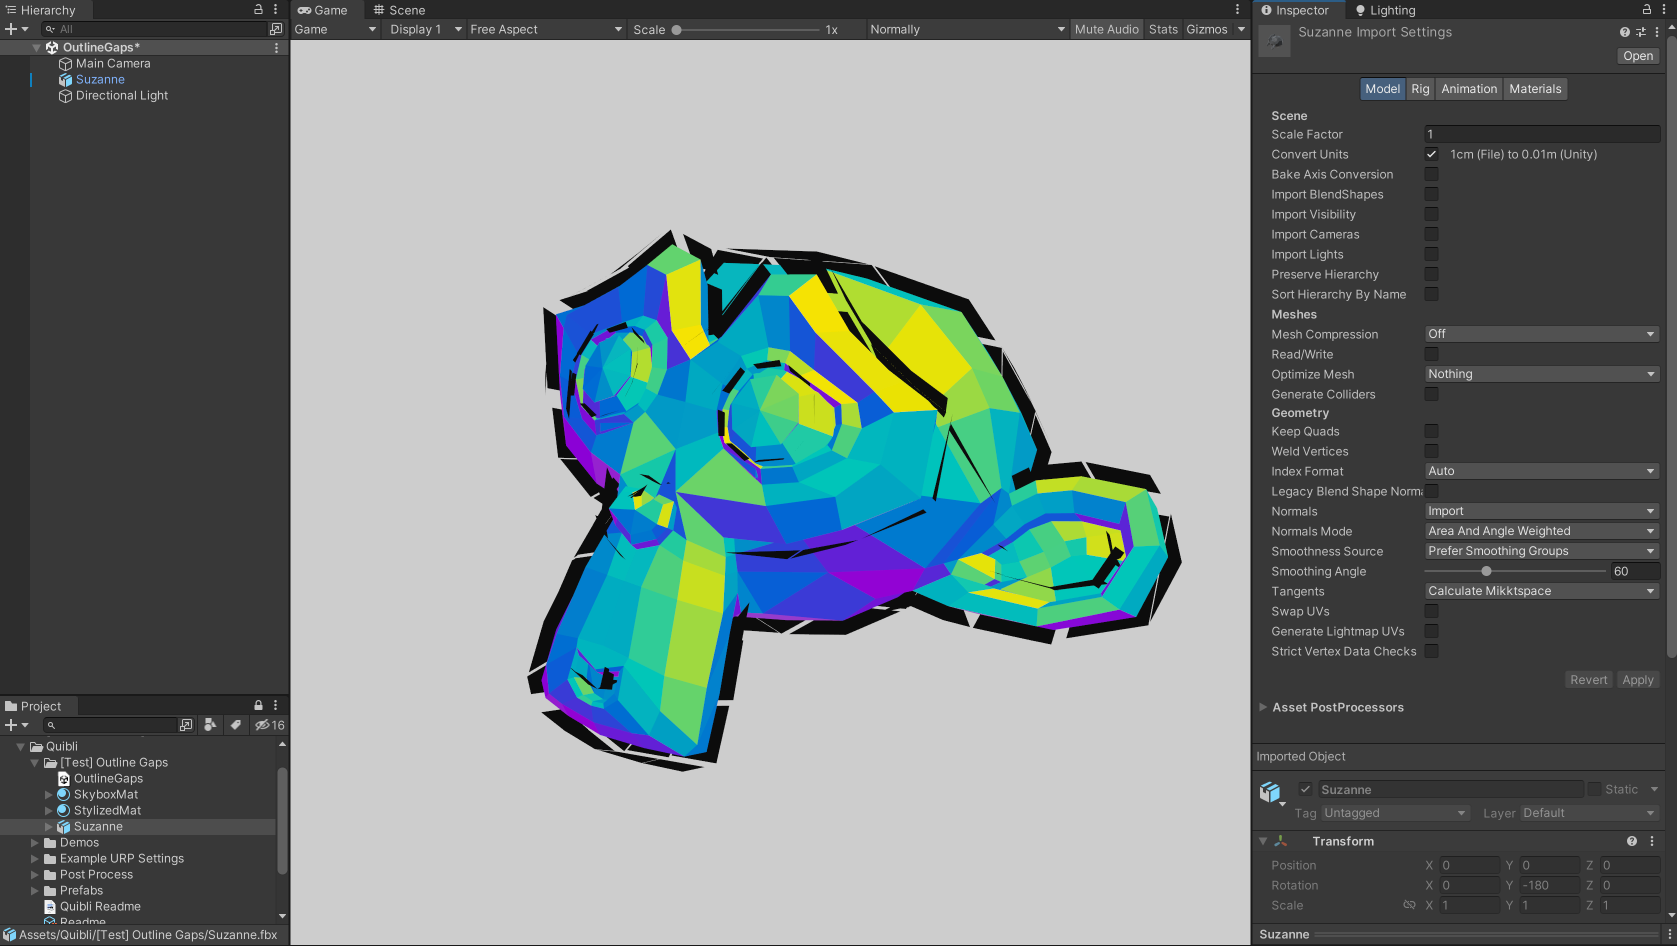
Gaps are clearly visible
In the Import Settings of the mesh, please, find the Normals parameter and change it from Import to Calculate. Then, drag the Smoothing Angle slider to the right. By doing so, you make the mesh smooth instead of sharp. The more you move this control to the right the bigger angle Unity will expect to consider it as sharp. Click Apply. The gaps should be gone.
No gaps
As an extra step, to clean up the result a bit, you go to the material and increase Depth Offset a bit. This will ‘push’ the outlines away from the camera.
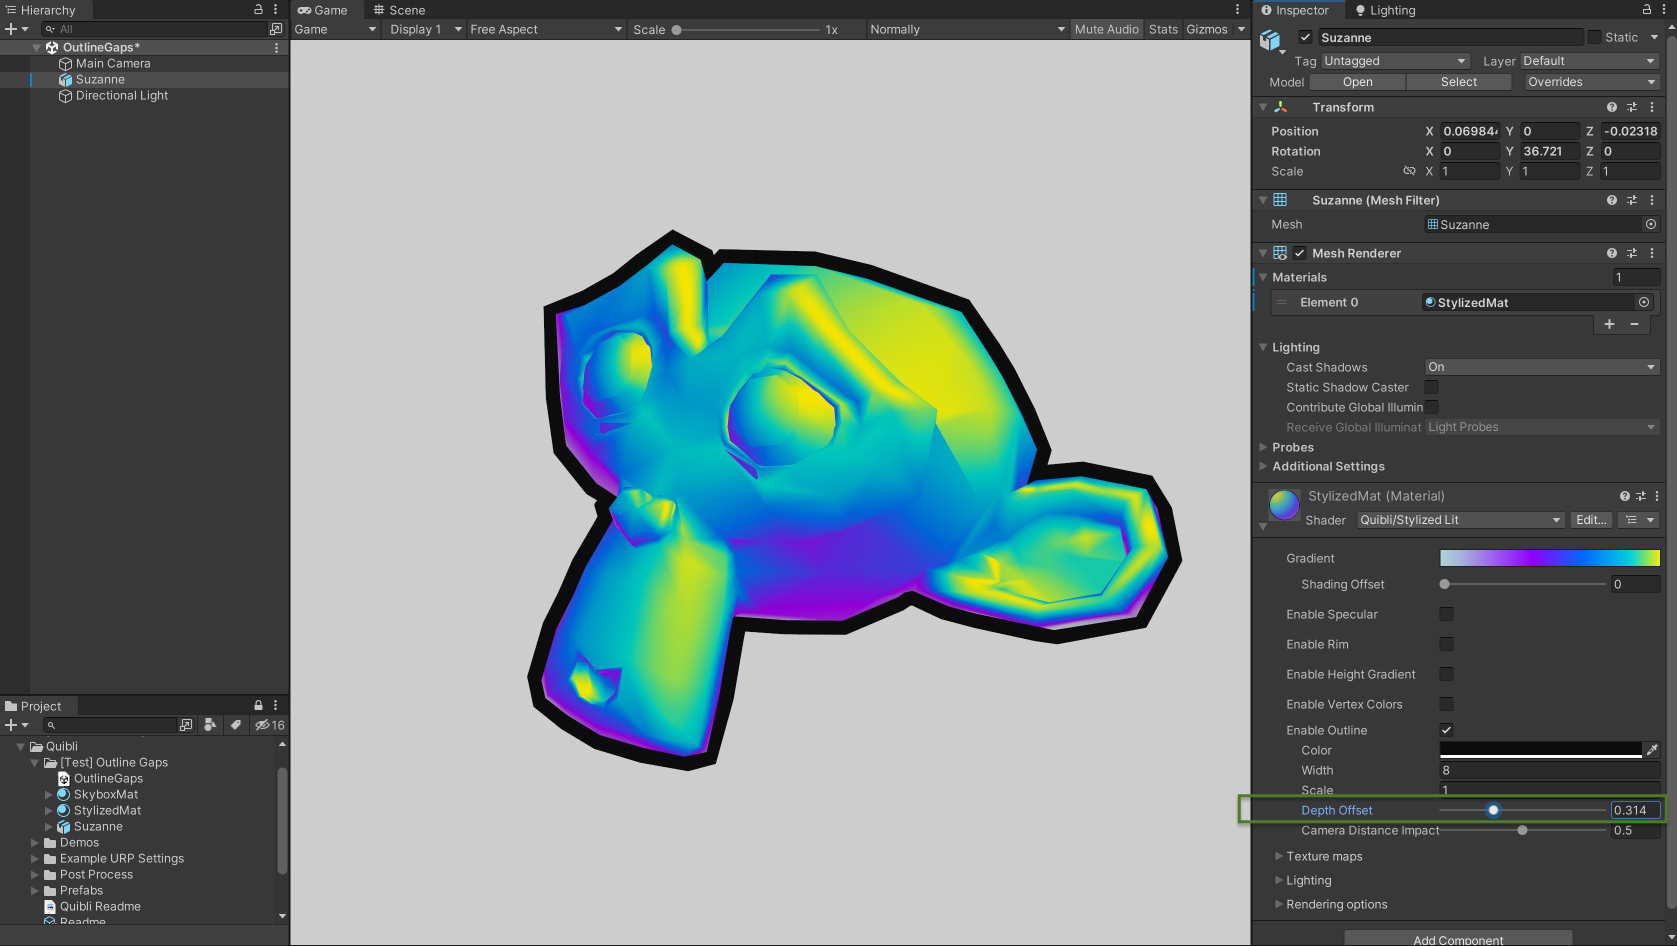
Using the Depth Offset parameter on the Stylized Lit shader to clean up the result
Please note that this way of doing the outlines is made to be super fast, but unlike in Photoshop it can’t produce an ideal outline. This method is called Inverted hull, and there are fundamental limitations to this fast approach of making the outline. For example, the outline itself in not a hollow contour as such but rather a modified (roughly said, ‘expanded’) copy of a model layered on the back of the original model. In most cases it can produce very good results with very fast performance, but the transparency on this model won’t work, as reducing the model’s opacity will reveal the filled pseudo-outline layer in the background.
Rendering Parameters
Rendering Options
Rendering options is a collapsible/expandable group of parameters that deal with opacity and transparency alongside a few other rendering and instancing parameters.
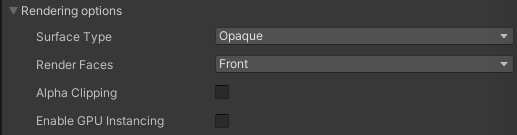
Stylized Lit Shader — Rendering parameters
- Surface Type The two options are Opaque and Transparent.

If Transparent Surface Type is selected, the Blend Mode menu becomes available with the following Blend Mode options: Alpha, Premultiply, Additive and Multiply.
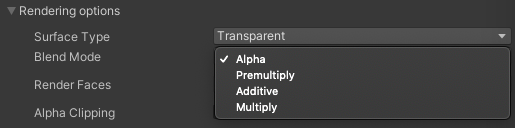
Blend Mode menu under Transparent Surface Type
- Render Faces Determines what faces to render. The three options are Both, Front, Back.

Render Faces menu
- Alpha Clipping Discards pixels based on the Albedo texture’s alpha channel.
- Threshold The minimum alpha in the Albedo texture to render a pixel, i.e. determines how soon the transparent portion is ‘transparent enough’ to be cut out.
- Enable GPU Instancing Uses GPU Instancing to render multiple copies of the mesh at once. More information in Unity’s documentation.
TIP. Some of the parameters, like Rim, Specular, Height Gradient and others work similarly to the according parameters in the analogous Stylized Surface shader in Flat Kit. If you didn’t find some specific info about these parameters in this manual, you might want to have a look into the Stylized Shader chapter of the Flat Kit manual.
DOTs Instancing
To enable DOTs instancing, please locate the StylizedLit.shader file (by default, it’s in Assets/Quibli/Shaders) and open it in a text editor. Then, find and uncomment the line (102) with the following code:
// #define DR_DOTS_INSTANCING_ON //
Troubleshooting
Below you can find answers to the typical possible questions when working with Stylized Lit shader.
Can’t apply the texture
- Please, make sure the model you are applying the material to is UV-unwrapped.
- If you are using a custom texture, please, make sure the format is supported.
Can’t find Stylized Lit in the list of the shaders
- Please try completely reimporting Quibli. Here’s how
Comments