Stylized Detail Post Effect
Stylized Detail Post Effect Brief Overview
After a profound research about the stylistic directions and unique characteristics of the overall look of the Japanese animation films, we concluded the gained knowledge into a single post effect. It is a tool that helps shape these subtleties that you see or simply feel in the movies but maybe cannot put your finger on.
The Stylized Detail is a post effect designed to add another layer of ‘that look’ you can see in traditional Japanese animation films (of course, it can and should be used in any creative project). Under the hood it does some complex processing to make the scene appear sharper, nuanced at the large scale and at the same time with simplified smaller details.
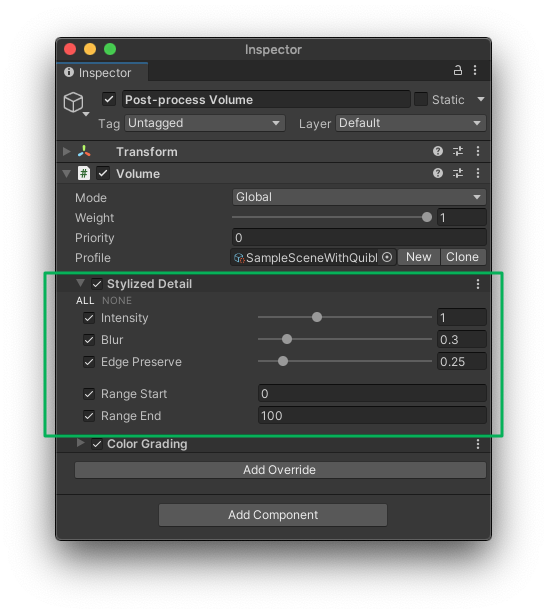
Stylized Detail Post Effect interface
Beginning to Work with Stylized Detail Post Effect
STEP 1. The Stylized Detail effect has to be added to the currently used Forward Renderer as a Renderer Feature. The Renderer Feature is called Quibli Post Process and includes Stylized Color Grading described here and Stylized Detail in the Before Post Processing and After Post Processing sections. The steps are below.
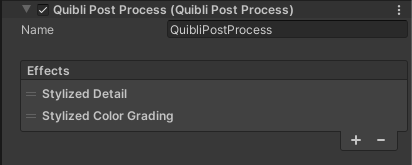
Stylized Post Effects Renderer Features loaded in Forward Renderer
- Locate the currently active Forward Renderer. It can be done in a few ways. One of them is to look at your camera’s Inspector panel ▶ Forward Renderer field. Search for this Forward Renderer, select it and look at the Inspector panel;
- Click Add Renderer Feature;
- Locate the Quibli Post Process item in the menu. Select it;
- In the Effects part of the Quibli Post Process, please, click the ‘+’ button and select Stylized Detail in the drop down menu.
STEP 2. After STEP 1 above is completed, as the Stylized Detail effect is a Volume Override created to be used in the Volume component of the camera, it should be added as a part of the post-processing onto the camera. The steps are below.
- Select a camera;
- Press Add Component on the bottom of Inspector panel;
- Type Volume in the search box, or locate it manually in Miscellaneous ▶ Volume, click on it once found;
- Click Add Override in the Volume;
- Select Quibli ▶ Stylized Detail.
Stylized Detail effect is ready to be used now.
In the Demo Scenes everything has already been set up and are ready to be used. Once you set up Quibli as described in the installation guide, all the Forward Renderers, Renderer Features and Volume Overrides are already installed and configured.
Parameters of Stylized Detail Post Effect
- Intensity Sets how strong the Stylized Detail effect is.
- Blur Increases the radius of the filter. It is advised to be used subtly.
- Edge Preserve Keeps the edges sharp, while the Blur parameter is in action.
- Range Start A depth value where the effect starts to kick in.
- Range End A depth value where the effect ends its impact. The effect works between the Range Start and Range End effect. If you enable only one of these parameters and leave the other in ‘off’ state, the disabled parameter would mean ‘infinity’.
Comments