Quick-Start Guide
Importing Quibli
A guide on downloading, importing and setting up Quibli
First of all, you need to import Quibli into your URP project.
Please, make sure you have the Universal RP project running, not Built-In RP (‘3D’, ‘Mobile 3D’) or HDRP.
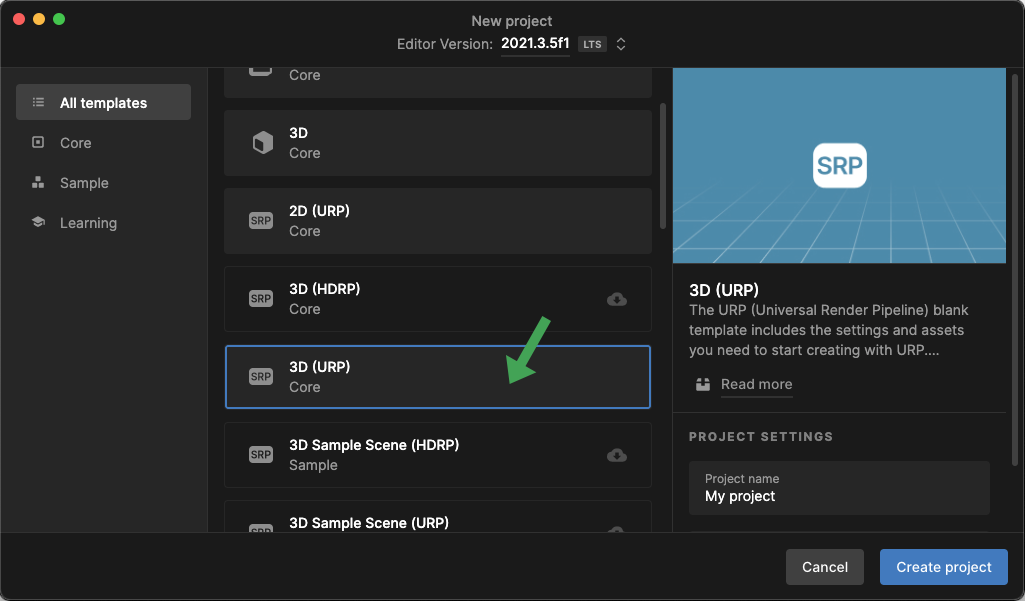
- In Unity, go to Window ▶︎ Package Manager;
- On the top left, please, find the Packages drop down menu. Select My Assets item there. You’ll find Quibli among your assets. Choose the version you’d like to import;
- Click Download (if it is not downloaded yet);
- Click Import;
- Finalize Installation (either automatically, or manually — described just below).
Finalizing Quibli Installation
After the importing, to finalize the installation it is advised to configure Quibli for Universal Rendering Pipeline.
Automatic Finalizing
Quibli comes with the Readme script tool, whose one of the jobs is to automatically configure URP to be working with Quibli. This procedure can also be done and undone manually, which is described in Manual Finalizing paragraph.
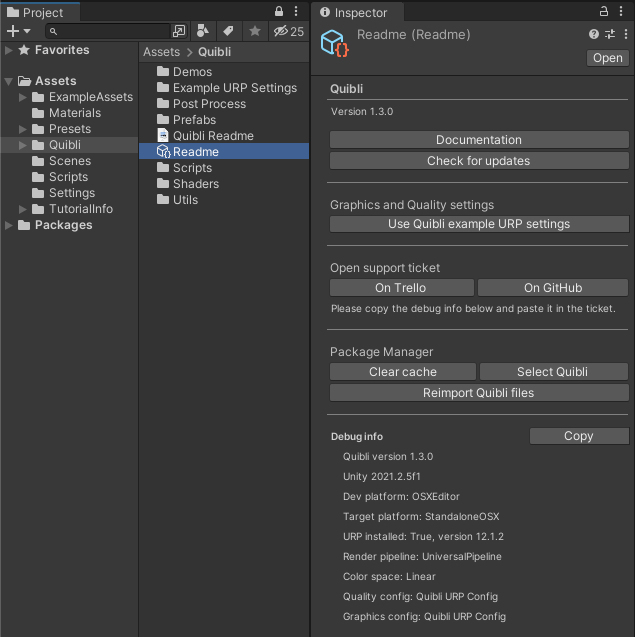
Readme tool interface and its default location
If you would like to use your own Rendering Pipeline Asset File what’s this? instead of the one that comes with Quibli (‘Quibli URP Config’ file), you’ll need to do it manually. The procedure is described in Manual Finalizing
- Please, locate and select the [Readme] tool in
Project panel ▶︎ Assets folder ▶︎ Quibli folder; - In the Inspector panel press the Use Quibli’s Example URP Asset button. This will set the example Quibli Rendering Pipeline Asset into Graphics and Quality windows found in Project Settings. That’s it, everything is ready now.
Manual Finalizing
- Locate the Quibli URP Config file in
Project panel ▶︎ Quibli folder ▶︎ [Render Pipeline] URP folder ▶︎ Example Settings folder.
You can use your own custom settings file. The Quibli one is needed for viewing the Quibli Demo scenes.

Quibli URP Config file location - Navigate to Edit ▶︎ Project Settings;
- Open the Graphics tab and select Quibli URP Config file in the Scriptable Render Pipeline Settings field;
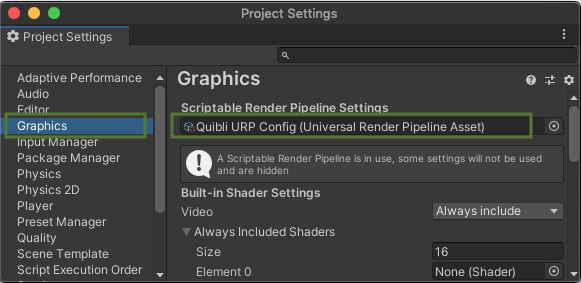
Graphics Settings Panel — select Quibli URP Config file in Scriptable Render Pipeline Settings field - Open the Quality tab and select the same Quibli URP Config in the field for all Quality Levels available in your project;
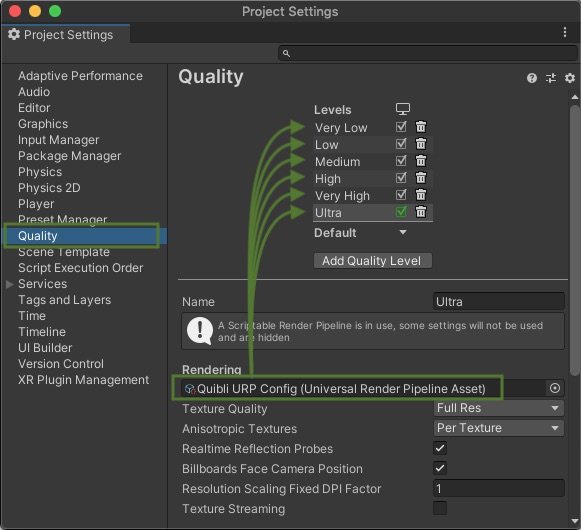
Quality Settings Panel — select Quibli URP Config file in Rendering field for all available quality levels - Important. If you would like to use your own Rendering Pipeline Asset File instead of the Quibli URP Config, which comes with Quibli, please make sure this asset file has Depth Texture and Opaque Texture checkboxes enabled. It is required if you would like to build your project to a mobile, for example.
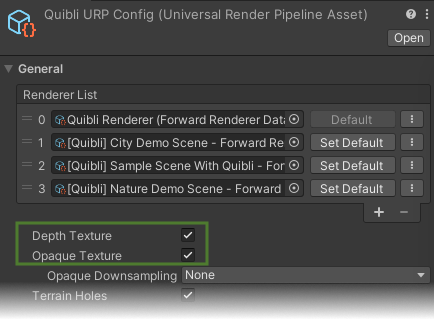
URP Config file should have Depth Texture and Opaque Texture turned on
NOTE. Should you have any difficulties with the installation of Quibli, please read through the Troubleshooting chapter on this page as well as have a look at the FAQs page. If your questions are not answered yet, please Report an Issue or write to us to info@dustyroom.com. We should be able to help you quickly. Please, don’t forget to include your set-up details like Unity and Quibli versions.
Troubleshooting
Below you can find typical possible issues when installing Quibli as well as other assets in Unity.
Can’t import Quibli
- First of all, please, make sure you downloaded Quibli using the Package Manager, as shown in the video.
- If the ‘Import’ button is greyed out, it may be due to the known Package Manager ‘cache’ issue. Here is how to fix it:
After importing, Quibli gives errors
- First, try restarting Unity. A simple restart indeed sometimes fixes some strange issues.
- Re-import Quibli. Here is how:
- Please, locate the Readme helper tool:
Project panel ▶︎ Assets folder ▶︎ Quibli folder ▶︎ select Readme and go to Inspector panel; - Press Clear Cache;
- Delete the Quibli folder from the Project panel ▶︎ Assets folder;
- Download and import Quibli from the Package Manager as shown in the video.
- Please, locate the Readme helper tool:
- Verify that the Unity version is equal or is newer than 2020.3 LTS.
- Check if you have a Universal RP project open. When creating a new project, it is important to choose Universal Rendering Pipeline and not Built-In aka ‘3D’ or ‘Mobile 3D’.

- Make sure you initially created your project as a URP project, not an ‘upgraded from Built-in RP’ one.
- If you must use Quibli in a project ‘upgraded from Built-in RP’, make sure you have the Universal RP and the Shader Graph packages installed from the Package Manager.
- Check if you have finalized the Quibli set-up for URP.
- Make sure that you are not using a Unity beta release.
- If nothing helps, please, write to info@dustyroom.com and include the following:
- Info about the errors (a screenshot of Console panel, for example)
- Locate and select the Readme file (located by default in Assets folder ▶︎ Quibli folder), go to the Inspector panel, press Copy button in the Debug info section and paste the copied text in your mail (or just make a screenshot of the panel).
After importing, some of the shaders are missing or cannot be compiled
- In Project tab ▶︎ Assets folder, right-click on Quibli folder, press Reimport.
- Check whether your setup meets the requirements.
- Try a complete reimport for Quibli. Here’s how.
I’m getting errors after moving the Quibli folder from Assets.
- This is due to a bug in Shader Graph which has been fixed in URP 12 (Unity 2021.2). To work-around the issue in earlier versions of URP, please click the “Reimport Quibli files” button in the Readme file after you’ve moved the Quibli folder.
Comments