Light Beam Shader
Light Beam Shader Brief Overview
The Light Beam shader can be used for the light rays as seen in the anime movies, as well as for other creative cases. For example, it can play the role of a foggy halo in the background, or a light sword. The Light Beam shader has an ability to decay with distance — once the needed parameters are set up, the halo, for instance, will be visible from distance but will gradually become less visible (more transparent) as the camera approaches it. The Light Beam is in HDR colors, meaning that it can glow if the scene has some kind of a bloom in it.
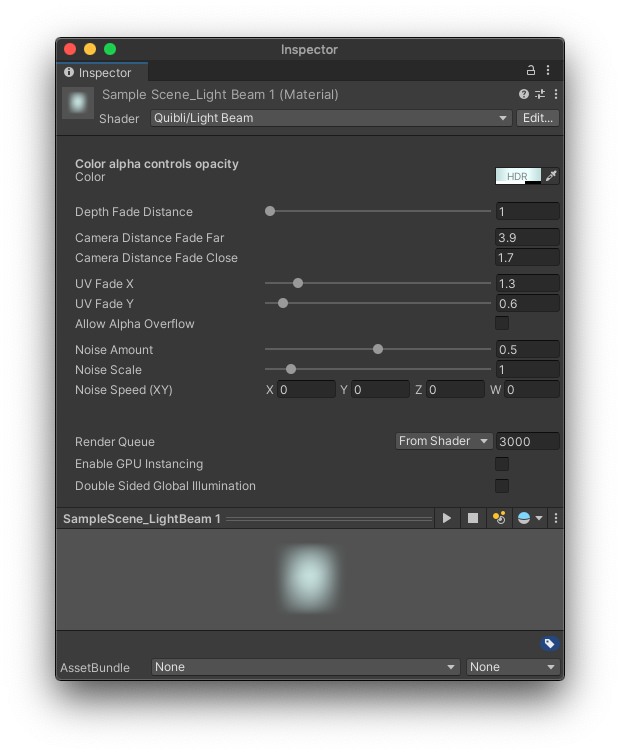
Quibli Light Beam Shader Interface
TIP. One of the pro-looking use cases of Light Beam can be highlighting some kind of a power-up item located in the scene in some distance from you, reminding you to pick it up. As you approach it, the effect has an option to decrease its intensity.
Beginning to Work with Light Beam Shader
- Create a material.
- In the Inspector panel, in the Shader drop down menu choose Quibli ▶︎ Light Beam. Now you can apply this material to a 3D game object on your Scene or in the Hierarchy panel.
Parameters of Light Beam Shader
- Color The parameter for selecting the color of the shader. As the Light Beam is in additive blending mode, you cannot make dark colors with it.
TIP. Color alpha controls opacity.
- Depth Fade Distance Controls the visibility of objects behind the light beam. If 0, the Light Beam occludes the objects behind it. If the value is high, the objects behind the Light Beam are fully visible.
TIP. Depth Fade Distance with higher values is useful for making a pseudo-fog effect.
-
Camera Distance Fade Far Sets the far point in the scene where the shader fades into full transparency. If the camera is farther than this value, the beam is 100% visible (alpha is ‘1’).
-
Camera Distance Fade Close Sets the close point in the scene where the shader fades in from transparency. If the camera is closer than this value, the beam disappears.
- UV Fade X Sets the intensity of the transparency-to-color gradient on the X axis.
- UV Fade Y Sets the intensity of the transparency-to-color gradient on the Y axis.
- Noise Amount Adds noise to the light beam to simulate particles flowing through the air.
- Noise Scale The granularity of the noise applied to the light beam.
- Noise Speed The rate at which the noise moves relative to the model’s UV vaules. Only the X and Y fields are used.
- Enable GPU Instancing Uses GPU Instancing to render multiple copies of the mesh at once. More information in Unity’s documentation.
Comments